Appetizers
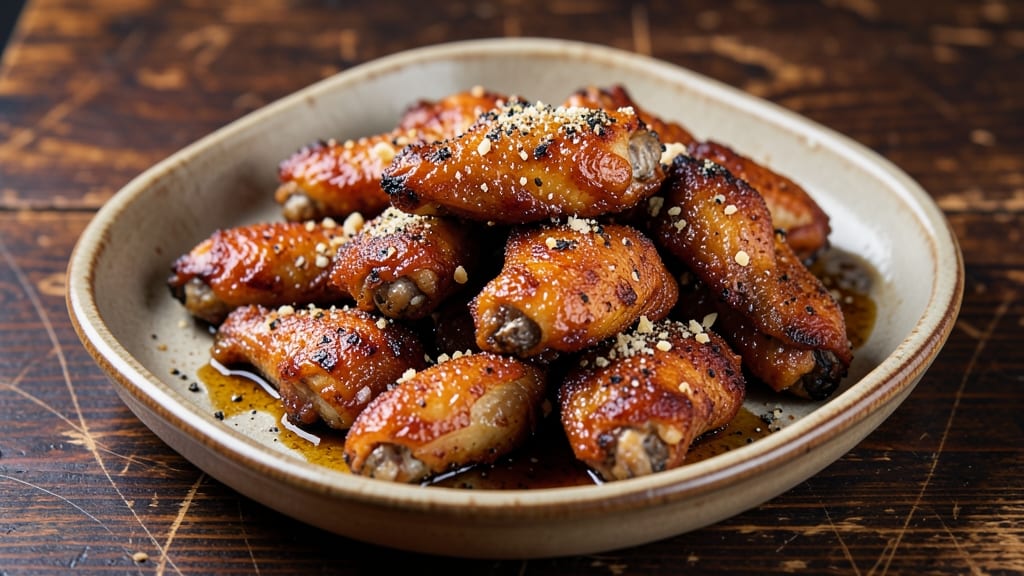
This soul food baked chicken wings recipe brings the rich, smoky comfort of Sunday dinners to your table with crispy-skinned wings that deliver deep flavor without the mess of frying. 💛 Growing up in small-town Georgia, I learned that soul food isn't just about taste—it's about tradition, texture, and the kind of satisfaction that comes from a dish made with care.
These wings capture that essence perfectly, with a dry rub that creates a flavorful bark while keeping the meat juicy inside.
The secret lies in the baking technique: high heat for crispy skin, low and slow for tender meat, and just the right amount of time to develop that smoky, savory depth.
I've perfected this method over years of cooking for crowds at The Smoky Pig, where we serve hundreds of pounds of wings weekly. The result? Wings with a crispy exterior that shatters at the first bite and meat so tender it falls off the bone.
What makes these wings truly special is how they balance tradition with modern convenience—no deep-frying required, yet they deliver that classic soul food experience. The wings pair beautifully with classic sides like collard greens or cornbread, but they're also versatile enough for game day or a simple weeknight dinner.
The dry rub alone transforms ordinary wings into something extraordinary, making this recipe a game-changer for any cook.
Once you try these, you'll understand why they've become a staple at gatherings—whether it's a family reunion or a casual get-together. The method is straightforward, but the flavor is anything but basic. Let's get started on creating wings that taste like home.
Ingredients for soul food baked chicken wings
Pantry staples meet soul food magic—just a handful of ingredients for wings that taste like Sunday dinner.
| Ingredient | Amount | Notes |
|---|---|---|
| Chicken Wings 🍗 | 3 lb | Fresh, drumettes and flats preferred |
| Brown Sugar 🍯 | ½ cup | Light or dark, packed |
| Smoked Paprika 🌶️ | 2 tbsp | For authentic smoky flavor |
| Garlic Powder 🧄 | 1 tbsp | Freshly ground preferred |
| Onion Powder 🧅 | 1 tbsp | For depth of flavor |
| Ground Black Pepper 🌶️ | 1 ½ tsp | Freshly cracked for heat |
| Salt 🧂 | 1 ½ tsp | Kosher or sea salt |
| Ground Cumin 🌿 | 1 tsp | Toasted for warmth |
| Dried Thyme 🌿 | ½ tsp | Or 1 tbsp fresh thyme leaves |
| Olive Oil 🫒 | 2 tbsp | Light coating for crispiness |
| Honey 🍯 | 1 tbsp | For glaze finish |
| Hot Sauce 🌶️ | 1 tbsp | Optional, for serving |
| Blue Cheese Dressing 🧀 | ½ cup | Classic soul food pairing |
The wings are the star, so grab fresh, never frozen—drumettes and flats give the best texture. Most grocery stores carry them in the meat section, often near the chicken breasts. If you can't find them, ask the butcher to cut them for you. Costco or Whole Foods usually have them pre-cut, which saves time. Look for wings with a good amount of meat on the bone—they'll stay juicier while baking. Pat them dry before seasoning (trust me on this), or the rub won't stick right.
No smoked paprika? Regular paprika plus a pinch of cayenne works in a pinch, but you'll lose that deep smoky flavor. Fresh thyme is ideal, but dried works fine at about one-third the amount. The honey glaze can be swapped for maple syrup if you're avoiding refined sugar. For extra crispiness, toss the wings in cornstarch before baking—just a light coating. The blue cheese dressing? Store-bought is fine, but homemade with crumbled blue cheese, mayo, and a splash of vinegar takes it to the next level. And if you're feeling fancy, add a sprinkle of crushed red pepper flakes to the rub for a little kick.
These wings keep well for 3-4 days in the fridge if stored in an airtight container. Reheat at 350°F for 10-15 minutes until crispy again. For a crowd, double the rub and bake in batches—your oven might not fit all 3 lbs at once. The leftovers? Perfect for sandwiches or salads the next day. And if you're prepping ahead, freeze the uncooked wings with the rub on them—they'll stay flavorful for up to 3 months. Just thaw overnight before baking.
Why You'll Love This Recipe
- No Frying, No Fuss: Honestly, I used to think crispy wings meant hours in the deep fryer, but this method? Just oven, parchment paper, and 45 minutes. Pat those wings completely dry—trust me, that’s the secret—and you’ll have golden, crackling skin without the grease cleanup. The olive oil and honey glaze caramelizes right on the pan, so you’re basically doing the work of a fry cook with half the effort.
- Sweet, Spicy, Soulful Bite: The brown sugar and smoked paprika combo is chef’s kiss—that’s the kind of flavor that makes your taste buds do a happy dance. Between the toasted cumin and garlic powder, every bite has depth, and the honey glaze ties it all together with a sticky, caramelized finish. I’ll be real: the first time I tasted these, I forgot they were supposed to be healthy. They’re dangerously addictive, but in the best way.
- Feeds a Crowd (or Your Cravings): Three pounds of wings? That’s enough to feed four hungry people—or one person who’s really hungry (looking at myself after a long day). They reheat beautifully for leftovers, so you can have seconds without the guilt. And if you’re prepping ahead? Slap the dry rub on raw wings, freeze them, and bake straight from the freezer—still crispy, still delicious. My secret weapon for game days, potlucks, or just because.
- Budget-Friendly Comfort: This recipe turns a simple 3-pound bag of wings into a showstopper without breaking the bank. The spices and honey are pantry staples, and the blue cheese dressing? A small jar lasts forever. I’ve made these on a Tuesday night with $10 and still felt like I was serving up a restaurant-worthy meal. The crispy, tangy, sweet combo makes it feel like a splurge, but your wallet won’t mind.
Step-by-step instructions for soul food baked chicken wings
Here's how to get that perfect crispy skin and smoky flavor without deep-frying.
🔥 Step 1: Prep the Wings for Maximum Crispiness
Preheat your oven to 425°F and line two baking sheets with parchment paper. Pat the 3 lb chicken wings completely dry with paper towels—this is non-negotiable for crispy skin. I mean really dry, especially around the joints where moisture hides.
In a large bowl, whisk together the ½ cup brown sugar, 2 tbsp smoked paprika, 1 tbsp garlic powder, 1 tbsp onion powder, 1½ tsp ground black pepper, 1½ tsp salt, 1 tsp ground cumin, and ½ tsp dried thyme. This dry rub is the soul of your wings—don't skip any of these spices. Toss the wings in the mixture until they're evenly coated, pressing the rub into the crevices. Let them sit for 10 minutes while the oven preheats—this helps the seasoning stick better.
🍳 Step 2: Create the Glazing Sauce and Coat the Wings
In a small bowl, mix together the 2 tbsp olive oil, 1 tbsp honey, and 1 tbsp hot sauce. This sticky glaze will caramelize beautifully while baking, giving your wings that glossy finish. Pour this mixture over the seasoned wings and toss until every wing is fully coated. The oil helps create crispiness, while the honey adds that perfect balance of sweet and smoky.
Arrange the wings in a single layer on your prepared baking sheets, leaving about ½ inch between each piece. This prevents steaming and ensures maximum crispiness. Here's the thing—don't overcrowd the pan. If you have to bake in batches, that's fine, but don't sacrifice crispiness for convenience.
🔥 Step 3: Bake to Golden Perfection
Bake the wings for 45 minutes, flipping them halfway through at the 22-minute mark. You want that skin to get nice and crispy, not rubbery. After 22 minutes, you'll see the edges starting to brown—that's your signal to flip. Rotate the baking sheets front to back for even cooking.
For the last 10 minutes, crank the oven up to 450°F to get that deep golden-brown color. Watch them closely—they go from perfect to burnt fast at this stage. They're done when the skin is crispy and the internal temperature reaches 165°F in the thickest part of the meat. If you don't have a meat thermometer, cut into one to check—juices should run clear.
🍽️ Step 4: Serve with Classic Blue Cheese Dressing
Let the wings rest for 5 minutes before serving. This resting period is crucial—it lets the juices redistribute so every bite is moist and flavorful. While they rest, warm the ½ cup blue cheese dressing in a small saucepan over low heat for 2-3 minutes, just until it's slightly thickened. You can also microwave it for 30 seconds if you're in a hurry.
Serve the wings hot with the warmed blue cheese dressing on the side for dipping. The tangy dressing cuts through the richness of the wings perfectly. For extra comfort, serve with celery sticks, carrot sticks, and warm dinner rolls. These wings are all about that crispy skin, smoky flavor, and that perfect balance of sweet, spicy, and tangy that makes soul food so satisfying.
Pro Tips For Making Soul Food Baked Chicken Wings
- Flip at 22 Minutes: I learned this the hard way—waiting until 30 minutes to flip means the bottom side gets soggy from its own juices. The edges start browning around 22 minutes, and that’s your cue to flip. Rotate the pans front-to-back too for even heat exposure—trust me, the back of your oven is a sneaky culprit for uneven cooking.
- Toast the Cumin First: Skip this and your wings will taste flat. Dry-toast the 1 tsp ground cumin in a small pan for 30 seconds until fragrant—it deepens that earthy warmth. Let it cool before mixing into the rub, or the oil in the wings will mute its flavor. (Yes, even if you’re impatient like me.)
- Don’t Skip the 10-Minute Boost: Cranking the oven to 450°F for the last 10 minutes isn’t optional—it’s what turns good wings into crispy wings. If you’re nervous about burning, set a timer and check every 2 minutes. The skin goes from perfect to charred faster than you think, and there’s no fixing it once it’s there.
- Coat Wings Twice: The first toss coats the wings, but the second one—after they’ve rested 10 minutes—is what locks in flavor. The rub sticks better after the initial moisture evaporates, and the glaze adheres like a second skin. (Pro move: Use tongs to press the rub into the crevices—don’t just dump it.)
Make-ahead tips for this soul food baked chicken wings
Prep Wings Ahead
I always prep the wings the night before to save time on game day. After seasoning them with the ½ cup brown sugar and spice blend, let them sit uncovered in the fridge for at least 12 hours—this helps the flavors penetrate deeper.
The dry rub will cling even better when you toss them with the 2 tbsp olive oil and 1 tbsp honey glaze in the morning. Just don’t forget to pat them completely dry before baking! 💡
Batch Baking Strategy
If you’re feeding a crowd, divide the 3 lb wings into two batches. Bake one batch for 30 minutes at 425°F, then transfer the first batch to a wire rack set over a baking sheet to keep them crispy while you finish the second batch.
This way, you avoid overcrowding and maintain that perfect texture. I’ve learned the hard way—overcrowding turns crispy wings into sad, greasy blobs. 🔥
Freezer Prep for Later
For maximum convenience, freeze the uncooked, seasoned wings in ziplock bags (squeeze out all air) right after tossing them in the rub. Thaw them overnight in the fridge before baking—no need to rush!
This method preserves the smoked paprika and cumin flavors beautifully, and they’ll taste just as good as fresh. I’ve frozen wings this way for holiday gatherings, and they’re always a hit. ❄️
Sauce Prep Ahead
Make the blue cheese dressing a day in advance and store it in an airtight container in the fridge. The flavors meld perfectly over time, and it’ll be ready to warm up quickly when your wings come out of the oven.
I like to add a splash of apple cider vinegar for extra tang—it balances the richness of the wings perfectly. Trust me, this small step makes serving so much easier. 🧀
Resting is Non-Negotiable
Even if you’re short on time, always let the wings rest for at least 5 minutes after baking. This isn’t just about juiciness—it’s about texture. The meat needs that moment to relax before you slice into it.
I’ve seen home cooks skip this step and end up with dry, tough wings. A little patience goes a long way! 💪
Reheating Leftovers Like a Pro
To revive crispy wings, reheat them in a 400°F oven for 10-15 minutes on a wire rack. This method keeps them from getting soggy. If you’re using the microwave, cover them loosely with a damp paper towel for 1-2 minutes—just enough to heat through.
I’ve tried every trick, and this is the only one that works consistently. 🔥
Nutrition facts
Frequently asked questions
Why does patting the wings dry matter so much for crispiness?
Drying the wings thoroughly removes surface moisture, which is the secret to achieving that perfect crispy skin. When wings are wet, steam builds up during baking, turning your crispy exterior into soggy disappointment. Pat them dry with paper towels—especially around joints—and you'll get that satisfying crunch every time.
Can I use fresh herbs instead of dried thyme in the rub?
If you have fresh thyme leaves, use 1 tbsp instead of ½ tsp dried. Fresh herbs have more intense flavor, so reduce the amount by about 1/3rd. Just make sure to chop them finely so they distribute evenly across the wings. The smoky depth will still shine through beautifully.
What's the best way to handle leftovers without losing crispiness?
Reheat your wings in a 400°F oven for 10-15 minutes on a wire rack set over a baking sheet. This method maintains crispiness better than the microwave. For extra texture, you can also air fry them for 5 minutes at 375°F after warming. Just don't skip the resting step before reheating!
How do I adjust this recipe if I'm making wings for a crowd?
Divide your 3 lb wings into two batches and bake them separately. After baking the first batch for 30 minutes, transfer them to a wire rack to keep them crispy while you finish the second batch. This prevents overcrowding and ensures every wing gets that perfect crispy texture. Trust me—crowds notice when wings stay crispy!